Pages

Friday, 30 September 2011

Wildart Tailblaze

This is official opening of the Wildart Trail. This is the cullmination of something like a year working with Kent Wildlife Trust on their Blean Project.
 

I had a conversation in the woods today with a dog walker who had walked his dog for ten years in the woodland. He said there was a noticible increase in people using the woods, you know for leisure walking, school trips and wheel chair special needs organisations bringing group outings, this increase in the last couple of years. He also said he'd seen a lot more animials recently, slow worms, more spieces of birds, lizards and even snakes! I hope this guy comes to this opening event and tells the same storey to Kent Wildlife Trust as that is the whole point and their aims fulfilled. I am delighted to have played a role in project.

Willow Weaving Techniques

We have created a place on the Wildart Trail called the 'Coppice Demonstration Area'. This is a flexible space where copicing techniques and skills are displayed, demonstrated and and this case practical workshops carried out. On this occasion by Alan Sage, who ran this 'willow weaving techniques' workshop for Students at Christ Church University and staff from the Kent Wildlife Trust. 
  

Anticipation:            looking in Alan's basket of tools  

I'm unable to pass on the skills we learned on this blog, but we learned discrete knots to join work together, how to add shapes onto a form that your already working on, plaiting, basic basket weaving and unusual hair pins?

 
'and that's all there is to it'!
 
unusual hair pins


 The previous workshop we had created large ants, using a random weaving technique, but this was much more structured and required concentration to follow systematic repeated sequences. Speaking from a peronal view point I found that almost every length of willow I use...somehow I manage to kink, creating weak points, combined my reluctance or lazyness to chop off the stouter  portions or 'butts' which then warp my creations out of shape, as the forces I have created within the structure compete. I wrestled for a long time with my fish, which in the end was a conifer tree. Other people managed fins, gills, tails and patterns for scales.


The final exercise was to cretae a sun flower and I had more success. A very enjoyable day, thanks again to Kent Wildlife Trust for oranising this and thanks to Alan Sage for passing his considerable knowledge on.


Here is a link to a slide show covering the days activities click here

Tuesday, 6 September 2011

A busy day down the woods

Everybody was in the woods today, it was busy and Cosmo was well in on the action. Its not often you can take your dog to work (unless your Fletcher who goes to work everyday).

the final 'totem post goes in, with designs by
Philip Howard Catholic Primary School
 
what am I looking at?

woodpeckers


they started off like this
 

I was up and down the ladder a few times attaching these to trees. This oak which I thought was dead, but after it was choped right back to its trunk especially for these woodpeckers. Little shoots started growing and it has sprung to life.  


we made this bench as well 

what am I looking for?

the last post


Entrance Arch

Whale Bone Arch was a working title for this feature which described it very well, even though it has nothing to do with whale bones. There were several particularly curved pine trees growing yards from the entrance. I guess this curved trunk is caused by the tree moving to reach more day light?

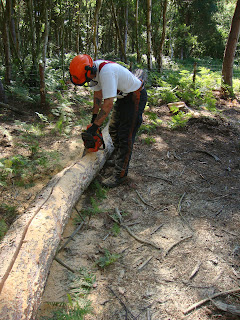
John from Kent Wildlife Trust identified which was the best one to use and felled it with a chain saw.

the chosen tree

he's done this before
I can tell
                                  
After quick work by John the tree was down, and I had not even managed to video it....

The branches wiped off quick and in no time
the tree is ready for the next stage


The next stage is a tricky cut running along the whole length of the tree.
 By leaving the two ends still joined and cutting the middle, then doing the ends last. It is essential to get a smooth cut as this will form the new face


Neither of us could really tell how this was going to look or what was the best way to install this thing and it lay on the floor for a couple of weeks waiting to be installed near the entrance. I walked past it several times with Cosmo, looking at it wondering if it would be easier and to install it with the bits I had imagined being in the ground, sticking up in the air. This would avoid having to cut a difficult mitre join during the installation.

this end in the ground
and this end in the air
 John had been thinking exactly the same thing as installation was hard enough already.

view from the trail

view from the main path


So, the feature is very firmly in and stable, while the surounding birch trees wil be cut back or removed to clear the view. How to decorate it, and what be appropriate is the next decision? This will wait a while as other features are going in and have priority. We can't call it the whale bone arch anymore as it does not look like one so much anymore and a bottle kiln is urban not woodland, so again its just sitting at the back of my mind. A spiders web with concentric rings and a circular hole in the centre is where my thoughts for it are right now!

What is very odd, is that from the main path you can't even see it, yet it must be approching 25 feet tall. The bark makes it blend in with its surroundings. A threshold you dont realise your crossing or an invisable door. Approach it from the other side and it is much more visable. I expect it will transform again when the surounding trees are trimmed back or possibly removed altogether.


the installed arch.

Friday, 2 September 2011

Xylophone Experiments?

See now........ what you have are pentatonic or diatonic scales, and dissonance is often a problem on chromatic instruments......er......... fine......I have no musical knowledge whatsoever, but I have really enjoyed just experimenting with this. I think technically speaking I am collecting empirical evidence and data for application when constructing the instrument on a larger scale.

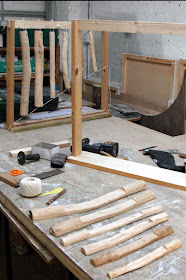
Actually I am just making trial and error experiments on a model xylophone. Choosing small logs of different thickness and cutting them to different lengths. Some I have cut in half longways and removed a lot of wood from the back, hoping this would make them sound better than just a plain log. I googled xylophones and found out that if you measure 22.5% of the total lengh in from each end to find the 'nodes', alternatively you could use the 'sprinkling salt' method?


empirical experiments
My logs are going to be hung vertically, so the location of nodes and support under them seems a little irrelevant, it does change the sound of the log but whose to say it sounds better than just a plain log? I can't.

my experiment with logs cut in half
 These sound different to just plain logs, and I quite like the smooth flat face to engrave designs on. I had to invent ways off attaching them so they stopped spinning round and round when played. With the back scooped off they look like they might have been made by someone who knew what they were doing?


my experiment with whole logs
 The whole logs produce a different sound and I cant tell which is best I will have to consult with my friends at Kent Wildlife Trust. Practically speaking it appears to me that both work just as well, though some pieces of wood are just naff sounding if they are a bit soft or damp, or may be just too small. What you hit the logs with also makes a difference, whether it is a piece of rebar (metal) which is what I used or just another piece of wood? So there are a lot of variables none seem particularly wrong, but then I can't hardly tell if notes go higher or lower.

What I do really like is carving patterns which wrap around the logs, it makes the instrument look rather primeval.......like my musical abilities.